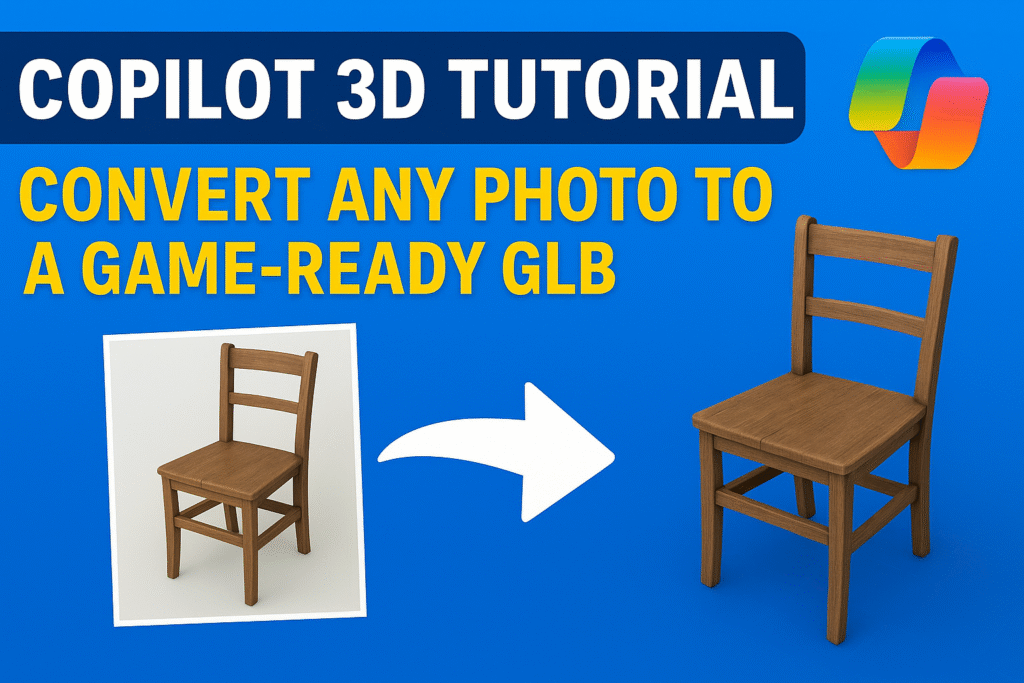
Roblox’s Mesh Generator API and the CUBE 3D, The new Roblox 3D AI ecosystem, have made AI modeling practical, fast, and shockingly useful for small studios.
This isn’t hype.
This is a real shift in how 3D teams work.
And if you’re a developer trying to ship a game without a 10-person art department, you should care. Because for the first time, you can generate a rough asset from a photo, run it through cleanup, optimize it for Roblox’s polygon caps, and drop it into Studio in minutes.
This guide is your full walkthrough.
No corporate fluff.
No “AI will replace artists” drama.
Just the honest truth: AI is now a tool that makes tiny teams competitive with studios ten times their size.
You’ll learn exactly:
- How the Roblox Mesh Generator API works
- How CUBE 3D fixes and optimizes the output
- How to build a proper AI asset pipeline
- Where the tech wins, and where it still sucks
- Real production rules for staying under Roblox’s performance limits
If you came here for shallow tips, click away.
This guide is for developers who want real results, not half-baked AI promises.
Ready?
Let’s walk step-by-step into Roblox’s 3D AI pipeline and build something that actually runs inside a real game.
Introduction to Roblox 3D AI and Why It Matters
1. What Roblox 3D AI Actually Solves for Developers
Most Roblox developers are drowning in work. You’re building maps, scripting systems, fixing bugs, polishing UI, handling updates, and somehow you’re also expected to model every single asset in your game. That’s not realistic. It’s why most projects stall or never ship.
Roblox 3D AI solves the bottleneck nobody talks about.
It kills the slow, manual, repetitive parts of asset creation that drain your energy and destroy your momentum.
Here’s the truth:
You don’t need a perfect hero asset for every part of your game. You need consistent, efficient, clean models that run well across millions of mobile devices.
This is exactly where Roblox 3D AI steps in.
It eliminates:
- the blockout phase
- the rough modeling stage
- the ugly first pass
- the hours spent shaping silhouettes
- the time wasted generating “filler” props
Instead of spending days building crates, walls, tools, barrels, furniture, props, and environmental clutter, you can generate a usable base in minutes. Then you refine it. That’s how real production teams work: fast base, clean polish.
For a solo dev or small team, that’s not just helpful.
It’s a superpower.
Roblox 3D AI lets you move:
- from idea
- to test
- to iteration
- to finished asset
ten times faster than the old way.
You stop doing donkey work.
You focus on the parts that matter: gameplay, world design, polish, and the models that actually need your artistic eye.
The developers who adopt this workflow will outbuild everyone else. The ones who cling to old methods will watch their competitors publish faster, iterate faster, and grow faster.
Roblox 3D AI doesn’t replace your skill.
It amplifies it.
2. Why the Mesh Generator API Changes the Workflow
The old Roblox asset workflow was slow and painful. You either modeled everything yourself, bought assets, or used free models that often tanked performance or looked inconsistent. Every option came with a cost.
The Mesh Generator API flips that entire system on its head.
Instead of starting from a blank Blender scene, you start from an idea.
A sketch.
A photo.
A reference.
The API takes that input and builds a usable 3D mesh for you. It’s not perfect, but it’s fast. And in game development, speed matters far more than perfection.
Here’s the real shift:
You don’t need to “make assets” anymore.
You need to fix, tune, and polish what the AI gives you.
That alone saves hours.
Sometimes days.
The Mesh Generator API changes your workflow in three major ways:
1. You prototype instantly.
Want to test a new room layout? A new mechanic? A new item?
Generate the mesh. Drop it in Studio. Iterate.
2. Artists stop wasting time on boring props.
Nobody wants to spend two hours modeling a trash bin or a wooden crate. AI handles the filler. Humans handle the hero assets.
3. Your pipeline becomes predictable.
The API output is consistent. That means your cleanup process becomes fast, standardized, and efficient. Small teams thrive on predictable systems.
This isn’t just a new tool. It’s a new workflow philosophy:
AI builds the base. You build the final product.
3. How CUBE 3D Boosts the AI Pipeline
The Mesh Generator API gives you speed.
CUBE 3D gives you control.
That combination is the real power here. Alone, the API produces rough meshes. Useful, but raw. You still need clean topology, proper UVs, and optimized geometry if you want your asset to survive inside a real Roblox experience without destroying performance.
CUBE 3D is what turns those AI-generated meshes into production-ready models.
Here’s how it boosts your pipeline:
1. It fixes the ugly parts the API leaves behind.
Roblox’s Mesh Generator is fast, but it can leave holes, warped edges, broken normals, or chaotic UVs. CUBE 3D cleans all of that automatically, giving you a stable foundation to work with.
2. It respects Roblox’s performance limits.
Roblox experiences run on everything from PCs to ancient mobile devices. CUBE 3D retopologizes meshes with performance in mind. You get clean, efficient geometry without the bloat.
3. It generates UVs that don’t break inside Studio.
Bad UVs mean broken lighting, weird textures, and ugly shading. CUBE 3D produces UVs that actually behave correctly in Roblox’s rendering systems.
4. It standardizes your workflow.
This is the secret advantage.
Once CUBE 3D is part of your pipeline, every AI asset goes through the same cleanup stage. That means consistent quality and predictable results, even when your team is tiny.
Put simply:
Roblox’s Mesh Generator makes your workflow fast.
CUBE 3D makes your workflow reliable.
This is how small teams build big projects without burning out.
4. Who Benefits Most from Roblox 3D AI Tools
Not every developer needs AI. But the developers who need it, really need it. Roblox 3D AI isn’t built for AAA studios with full art teams and big budgets. It’s built for the massive majority of creators who are doing everything themselves.
Here’s who benefits the most:
1. Solo developers who wear every hat
If you’re scripting, designing, building maps, making UI, and creating every asset… you’re doing five jobs. AI lets you drop the most time-consuming one: base modeling. You’ll finally have time to focus on gameplay instead of modeling chairs and crates all day.
2. Small teams trying to ship consistently
Teams with two or three people can’t afford to spend a week making props for a single map. AI gives them the power to generate dozens of usable assets fast, then spend their limited hours polishing the essential ones.
3. Builders who aren’t 3D artists
Many Roblox creators are great at design but not at modeling. AI removes the skill barrier. It lets you produce assets you can be proud of without needing years of Blender experience.
4. Fast update cycles and live-service games
If you’re running a game that updates weekly, AI is a massive advantage. You can generate new props, decor, items, or environment pieces on demand and push updates without slowing your content pipeline.
5. Beginners learning the 3D pipeline
AI-generated models give beginners a starting point to study topology, UVs, and mesh structure. It’s the best hands-on learning shortcut for understanding how real assets work.
Roblox 3D AI isn’t replacing anyone.
It’s removing the friction that keeps most creators from finishing their games.
What Is the Roblox Mesh Generator API? (Full Breakdown)
1. How the Mesh Generator Reconstructs 3D From Images
Roblox didn’t build the Mesh Generator API to be cute.
They built it to convert simple 2D inputs into usable 3D meshes fast enough for real development. The system analyzes your image and tries to rebuild the shape as if a junior 3D artist was doing a rough blockout.
Here’s how the AI actually thinks:
It identifies the silhouette first.
The outline of your object is the foundation. If your image has clean edges, the AI produces a clean mesh. If the background is chaotic, the mesh turns into garbage. Silhouette clarity is the number one factor in 3D reconstruction quality.
It estimates depth from lighting and symmetry.
The AI does not know the real shape. It makes an educated guess using shading, curvature, shadows, and common object structures. This is why simple items like crates, chairs, barrels, tools, and props work extremely well with Roblox 3D AI.
It generates a closed 3D volume behind the 2D shape.
Once it understands the outline and estimated depth, the API creates a full mesh. It fills in the back and sides automatically. Sometimes it’s perfect. Sometimes it’s weird. But for most game props, the results are more than good enough.
It outputs geometry optimized for Roblox performance.
This is the real advantage.
Unlike generic AI 3D tools, Roblox’s API avoids insane polygon counts. The mesh is intentionally lightweight so it runs smoothly on low-end mobile devices. You get a predictable, safe base model for your game.
This process isn’t flawless, but it’s reliable. And reliability is exactly what small studios need if they want to build AI-driven asset workflows without drowning in cleanup work.
2. Supported Input Types for AI Mesh Generation
The Mesh Generator API isn’t picky, but it performs dramatically better when you feed it the right kind of input. If you want clean meshes with minimal cleanup, you need to understand exactly what the AI can handle and what it can’t.
Here are the input types the Roblox API supports and how well each one performs:
Clean photos of real objects
A simple photo with a clear outline, neutral lighting, and no clutter gives the AI everything it needs to reconstruct a stable 3D volume. These images lead to the most predictable and clean results.
Flattened renders or PNG concepts
You can export a front-view render from Blender or another 3D tool and feed it to the API. This works better than you might expect because the silhouette is perfect and the shading is controlled. If you want fast consistency, this is a great method.
High-contrast object cutouts
These work extremely well. If you cut the object out from its background and give the AI a clean silhouette, you remove the biggest source of confusion. Use this when you want the highest hit rate on clean geometry.
Now, here are the inputs that produce unreliable results:
Multiple objects in the same frame
The AI doesn’t know which one to reconstruct. It blends shapes together, creating unusable geometry.
Cluttered backgrounds
Anything noisy behind your object will contaminate the mesh. Shadows, patterns, reflections, or overlapping objects confuse the silhouette detection.
Feeding the API the right inputs is the difference between a 5 minute cleanup and a 2 hour cleanup.
Most “bad AI output” comes from bad inputs, not from the AI itself.
3. Strengths of Roblox’s Mesh Generator for Game Assets
Most AI tools generate pretty pictures and unusable meshes. Roblox went the opposite direction. They built the Mesh Generator API specifically for game-ready assets, not art demos. That alone puts it miles ahead of other AI 3D tools.
Here are the real strengths you can rely on every single day:
It creates meshes that won’t destroy your performance
Roblox games live on mobile.
If your poly count is trash, your performance dies.
The Mesh Generator API produces lightweight geometry by default. It avoids insane vertex counts, and it keeps silhouettes simple enough to run on low-end devices without melting a player’s phone.
It gives you predictable results
AI that behaves unpredictably is useless in production. What makes the Roblox mesh generator valuable is consistency. The outputs follow the same patterns, the same limitations, the same quirks. Once you learn those patterns, your cleanup becomes fast and almost automatic.
It dramatically reduces modeling time
You stop wasting hours on blockouts, basic shapes, filler props, and repetitive modeling tasks. The AI builds the first pass for you. You just refine it. That alone can cut total asset creation time by more than half.
It integrates perfectly with the Roblox ecosystem
No weird import issues.
No broken normals.
No incompatible formats.
Roblox built this API for Roblox creators. That means the mesh, UVs, and scale behave predictably inside Studio.
This is why Roblox 3D AI isn’t just “cool tech.”
It’s a practical production tool that small teams can rely on to make games faster, with less stress, and with more consistent asset quality.
4. Common Limitations Devs Need to Plan For
The Mesh Generator API is powerful, but it’s not magic. If you don’t understand its limitations, you’ll waste time trying to fix things that can’t be fixed. Smart developers plan around these issues instead of fighting them.
Here are the limitations you must keep in mind:
It struggles with highly detailed or irregular shapes
Objects with lots of tiny parts, wires, holes, or chaotic structure confuse the AI. The result is usually a melted blob or tangled geometry. Don’t feed it complex mechanical pieces and expect miracles.
Backside reconstruction is always a guess
The AI only sees the front view. It invents the back. Sometimes it nails it, sometimes it gives you something weird and rounded. If you need perfect accuracy, you’ll have to fix or rebuild the backside manually.
Textures are often basic and need rework
The API focuses on geometry, not beautiful materials. You’ll usually need to repaint or touch up the textures if you care about visual consistency in your game.
Cluttered backgrounds ruin the silhouette
If the object blends into the environment or overlaps with other items, the AI gets confused and your mesh will suffer. Clean input images are non-negotiable.
Scale and orientation aren’t always reliable
Sometimes the generated mesh imports into Studio way too big, too small, or rotated incorrectly. This is easy to fix, but you should expect it every now and then.
If you build your workflow around these limitations, the Mesh Generator API becomes a massive time saver instead of a source of frustration.
What Is CUBE 3D and Why Roblox Developers Use It
1. How CUBE 3D Fixes and Cleans AI-Generated Meshes
Roblox’s Mesh Generator API gives you speed, but it also gives you messy topology, uneven surfaces, and the occasional cursed geometry. CUBE 3D is the tool that cleans up the chaos. It analyzes the AI-generated mesh, removes garbage geometry, smooths rough areas, and rebuilds the structure so your model behaves correctly inside Roblox Studio.
This cleanup step turns an “AI draft” into a real game asset you can rely on.
2. Retopology and Optimization Specifically for Roblox Limits
Roblox isn’t Unreal Engine.
You can’t push high-poly assets and expect mobile players to survive.
CUBE 3D understands this. It retopologizes the mesh with low-cost, performance-friendly geometry while keeping the silhouette intact. The result is a clean, efficient mesh that respects Roblox’s strict performance constraints without looking like a deformed blob.
3. UV Mapping, Textures, and Material Cleanup With CUBE 3D
Bad UVs make your model look cheap, broken, or flat-out wrong. AI tools often generate chaotic UV coordinates that stretch textures everywhere. CUBE 3D builds clean UV maps automatically, giving your textures a proper foundation.
It also supports texture cleanup, sharpening, and re-baking so your Roblox assets look consistent across your entire game.
4. When CUBE 3D Should Not Be Used for Roblox Assets
CUBE 3D is not a universal magic button. If your asset is extremely simple, already optimized, or intentionally stylized in a way AI cleanup might ruin, skip it.
Example: voxel assets, solid primitives, ultra-low poly props.
Those are usually faster to model by hand.
Save CUBE 3D for assets where cleanup matters and complexity justifies the AI polish.
Preparing Inputs for the Mesh Generator (Photos, Images, Sketches)
1. Best Types of Images for Reliable Roblox 3D AI Output
If you want good AI output, you need good input.
The Mesh Generator API is not psychic. It reconstructs shapes based on whatever you feed it, and if the image is trash, the mesh will be trash too.
Here are the image types that produce the best, most predictable results:
Clear front-view photos
This is the gold standard. A clean front shot with neutral lighting gives the AI everything it needs to understand shape, depth, and silhouette. Props like crates, chairs, tools, shelves, and simple furniture convert beautifully.
Side-view or orthographic-like photos
If you can take a clean side photo, the AI handles it almost as well as a front view. The fewer perspective distortions, the better the reconstruction.
High-contrast cutouts
If you remove the background and leave only the object on a solid color, the result is insanely clean. The AI reads silhouettes perfectly, making mesh generation much more reliable.
Simple renders with flat shading
Export a flat-shaded PNG from Blender or any 3D tool. This gives the AI perfect silhouette definition and predictable surface cues. It’s one of the best input types for consistent results.
Minimalist concept drawings
If the drawing is clear and the shape is obvious, the Mesh Generator handles it surprisingly well. Think Roblox-style props, blocky items, simple weapons, and stylized accessories.
The rule is simple:
Clean images = clean meshes.
Noisy images = headaches and wasted time.
Feed the AI images it can understand, and it will give you meshes you can actually use inside Studio.
2. Common Input Mistakes That Cause Bad Meshes
Most “bad AI output” isn’t the AI’s fault.
It’s the developer feeding it images that no reconstruction model on the planet could understand.
Roblox 3D AI is fast, but it’s not a miracle worker. If your input is sloppy, you’ll spend more time fixing the mesh than generating it.
Here are the mistakes that ruin results every time:
Messy backgrounds full of clutter
If the AI can’t tell where the object begins and ends, it guesses. And guessing leads to random holes, melted shapes, or geometry fused with the background. Always isolate your object.
Objects overlapping or touching other objects
Two objects touching each other confuse the silhouette detection. The AI tries to blend them into one shape, creating unusable blobs. Keep your subject alone in the frame.
Heavy shadows, reflections, or bright highlights
Lighting issues distort the shape. Shadows make the AI think there’s more geometry. Reflections make surfaces look deeper or different. Highlights flatten the form. Neutral lighting is your best friend.
Extreme camera angles with strong perspective
Steep angles warp the silhouette. AI reconstruction becomes messy because depth estimation gets harder. Stick to clean front or side views when possible.
Low-resolution or blurry images
If YOU can’t see detail, the AI can’t either. Blurry edges, muddy colors, and pixelated shapes produce sloppy meshes that require heavy cleanup.
Complex objects with thin parts or tiny details
Even with a perfect photo, the AI struggles with objects that have wires, holes, chains, branches, or many protrusions. Keep your inputs simple unless you’re ready for extra cleanup work.
If you avoid these pitfalls, your Roblox 3D AI output becomes not just usable, but shockingly good for something generated in seconds.
3. How to Photograph Objects for Accurate 3D AI Conversion
If you want high-quality 3D output, you need to take photos the AI can actually understand. Roblox’s Mesh Generator isn’t magic. It reads shapes, shadows, and edges to guess the depth. The clearer your photo, the cleaner your mesh.
Here’s how to capture photos that give you accurate, predictable 3D AI reconstruction:
Use neutral, even lighting
Soft lighting avoids harsh shadows and blown-out highlights. When the lighting is clean, the AI reads surface curvature correctly. No confusion, no fake geometry.
Put the object on a simple, solid background
A plain wall or sheet works best. The AI needs a crystal-clear silhouette. Even a slightly patterned background can pollute the outline and mess up the reconstruction.
Shoot at the object’s level, not from above
Eye-level shots preserve shape. High or low angles distort perspective and confuse depth detection. Keep the camera straight, parallel to the object.
Fill the frame with the object
Don’t photograph something from five meters away. Move closer. Make the object the obvious subject. Give the AI as much visual data as possible.
Avoid motion blur at all costs
Blurry edges are a death sentence for AI-generated meshes. Hold your phone still. Or better: place it on a table or tripod. Sharp edges equal clean geometry.
Use one object per photo
Never put multiple items in the same shot. The AI doesn’t know which one is the real target and blends shapes together. One image, one object. Always.
Taking good photos isn’t about being a photographer.
It’s about respecting the rules the AI follows.
Do that, and the Mesh Generator API will give you reliable, fast, and clean base meshes every time.
4. Preprocessing Tips That Improve AI Reconstruction Quality
You can take a perfect photo and still get a bad mesh if you don’t prep it correctly. Preprocessing is the quiet cheat code behind clean Roblox 3D AI output. A few small adjustments dramatically improve how the Mesh Generator API reconstructs depth and shape.
Here’s what you should do before sending any image to the API:
Crop tightly around the object
Remove empty space. A tight crop forces the AI to focus on the object’s silhouette instead of the background. This reduces reconstruction errors and gives you a more accurate mesh.
Boost contrast slightly
You don’t need dramatic edits. Just enough contrast so the edges are clear. Clear edges equal accurate 3D reconstruction. Muddy edges equal warped geometry.
Remove background noise
If you can, cut out the object and place it on a plain background. Even a simple white or dark backdrop can take mesh quality from “barely usable” to “clean and easy to fix.”
Straighten the image
If the object is tilted, the AI assumes the tilt is part of the geometry. Straighten vertical objects vertically and horizontal ones horizontally. Orientation matters.
Reduce reflections and hotspots
Reflective or shiny surfaces can mislead the AI into thinking certain areas are deeper or more curved than they are. A tiny adjustment to reduce glare goes a long way.
Sharpen edges slightly
Do not overdo it.
Just a touch of sharpening helps the AI detect boundaries more reliably without introducing noise.
Preprocessing isn’t optional.
It’s what separates people who get great AI results in seconds from people who spend hours fixing warped meshes.
Master this step and your Roblox Mesh Generator pipeline becomes smooth, predictable, and shockingly efficient.
Setting Up and Integrating the Roblox Mesh Generator API
1. Installing Requirements and Authenticating API Access
Before you can generate any 3D assets with Roblox’s Mesh Generator API, you need a clean setup. This part isn’t glamorous, but it’s mandatory. If your environment is misconfigured, the API won’t respond, your requests will fail, and you’ll waste time debugging issues that never should have existed.
Here’s the exact setup you need:
Install the Roblox API dependencies
Roblox provides authenticated HTTP endpoints for AI-related features. Make sure you have the latest version of the Roblox Open Cloud libraries or SDK wrappers you plan to use. Outdated packages break everything.
Generate your API key in Roblox Creator Dashboard
Go to Creator Dashboard → Open Cloud → API Keys.
Create a new key with the correct permissions.
This is where most developers screw up. If you don’t enable the Mesh Generator permission scope, every request will fail silently.
Secure your key
Do not hardcode it.
Do not share it.
Do not put it in a public script.
You can use environment variables, secrets managers, or encrypted config files. Treat it like a password.
Set up your HTTP environment
Whether you’re using Python, Node, or a server backend, make sure your HTTP client supports JSON bodies and large responses. Mesh data is heavier than typical API calls.
Validate that your key works
Send a simple ping request to Open Cloud. If it returns a valid response, you’re ready. If it fails, fix it now. Don’t move forward until the key and permissions are correct.
This setup step is boring, but if you get it wrong, nothing else in your pipeline will work. The developers who rush this part are the same ones who get stuck googling error messages for hours.
2. Sending Your First Request to the Mesh Generator
This is where Roblox 3D AI stops being theory and becomes something real. Once your API key is working, sending your first request is straightforward. But you need to do it properly, or the Mesh Generator API will throw useless errors that tell you nothing.
Here’s exactly how to structure a clean, reliable first request:
Use the correct endpoint
Roblox provides a dedicated Mesh Generator endpoint under Open Cloud. Make sure you’re hitting the official URL. A single typo means the API ignores you completely.
Attach your API key in the header
Your key must be in the Authorization header using the correct format. If the format is wrong, the request won’t authenticate. And the API will not tell you why. It will simply reject it.
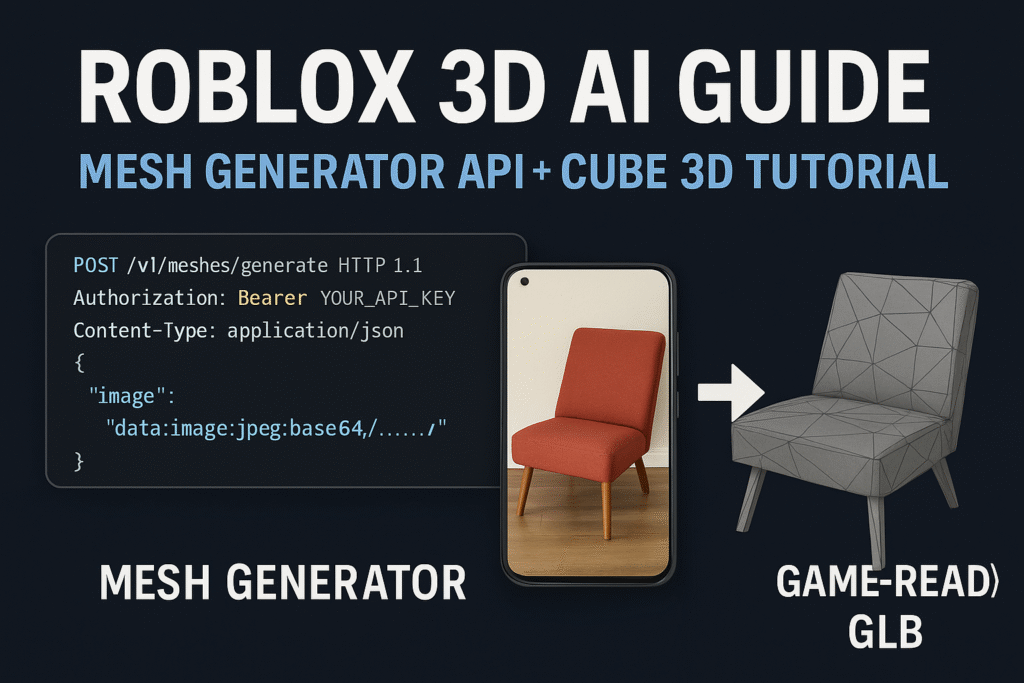
Send a valid image input as base64 or multipart
The Mesh Generator accepts images (PNG or JPG) either as base64 data or multipart form. Choose whichever fits your environment. Just make sure the image isn’t corrupted, empty, or insanely large. The AI can’t reconstruct noise.
Set the required parameters
You must tell the API what kind of reconstruction you want. Basic examples include object type, resolution, or preferred output density. Without clear parameters, the generator uses defaults that may not suit your asset.
Expect a delayed response
This isn’t a micro-request. AI reconstruction takes processing time. The response may take several seconds depending on input size. Don’t panic. Don’t spam retries. Just wait for the result.
Log the entire response
Don’t just log the mesh. Log the metadata. Roblox returns information like processing time, warnings about input quality, and fallback modes. These details help you fix issues early.
Your first request is about proving your pipeline works.
Once that’s done, everything else becomes smoother.
3. How to Parse and Validate the API Response
Once the Mesh Generator API responds, don’t rush straight to importing the mesh. Your first job is to validate the response. AI outputs can fail quietly, produce partial data, or generate malformed geometry that breaks later in Studio. Smart developers check everything before moving forward.
Here’s what you must validate in every response:
Check for generation warnings
Roblox includes warnings in the response if the input was low quality, blurry, or had issues with silhouette detection. These warnings are priceless. They tell you exactly why your mesh might look wrong before you even open it.
Verify the mesh data isn’t empty or truncated
A corrupted base64 block or a cut-off mesh file means your pipeline or the AI process broke somewhere. You need to verify the size of the output and confirm the data is complete before decoding it.
Confirm the output format is correct
The API typically returns GLTF or mesh-compatible formats. If the format doesn’t match what your importer expects, something went wrong. Always confirm the file type before you decode or export it.
Scan for malformed geometry markers
Some responses include metadata about mesh complexity, vertex count, and surface issues. If the AI flags messy topology or unstable surfaces, you know you’ll need cleanup in CUBE 3D.
Check bounds, scale, and orientation
Sometimes the model is technically valid but positioned absurdly. A mesh the size of a skyscraper or oriented backwards will cause headaches once you import it. Validate dimensions inside the response metadata.
Good developers inspect responses.
Great developers automate these checks and build a pipeline that stays clean no matter how many assets they process.
4. Debugging Errors and Failed Reconstructions
The Mesh Generator API won’t always cooperate. Sometimes the reconstruction fails or returns an “unknown error” with zero explanation. That’s normal. AI pipelines break for simple reasons, and you need a reliable way to diagnose the problem fast.
Here’s how to debug failures without wasting hours:
Check the input first, always
Nine out of ten failed reconstructions are caused by bad images. Blurry photos, cluttered backgrounds, weird angles, or low resolution will break the AI. Before you blame the API, fix your input.
Verify your API key permissions again
Even if your key worked yesterday, double-check your scopes. Roblox updates permissions, and a missing Mesh Generator scope will instantly cause silent failures.
Reduce the image resolution
If your input file is too large, Roblox might reject it or time out internally. Lower the resolution and try again. You gain nothing from ultra-high-res sources.
Look for response error codes in the metadata
Roblox often hides errors inside metadata, not in the main response. Codes like invalid input format, silhouette failure, or background detection errors are buried there. Log everything.
Switch image format
Some pipelines break JPG. Others break PNG. If your request fails for no clear reason, try switching formats. You’d be shocked how often this solves everything.
Regenerate instead of repairing
If the output mesh looks like melted wax, don’t go to Blender trying to fix it. Delete it and run the generation again. Fixing trash takes longer than regenerating something clean.
A good AI pipeline stays stable because the developer knows how to debug failures quickly.
Do this right, and mesh generation becomes predictable instead of frustrating.
Full AI Asset Pipeline: Roblox Mesh Generator + CUBE 3D
1. Converting Images Into 3D Meshes Using Roblox AI
This is where everything comes together.
Your input image goes in, and a 3D mesh comes out. Fast. Predictable. Production-ready enough to clean up in minutes.
Here’s the correct way to convert images to meshes using Roblox 3D AI:
Prepare the photo using the rules you already learned
Clean background.
Neutral lighting.
Sharp silhouette.
Crop tight.
Every single one of these steps matters, because the Mesh Generator API reconstructs from the silhouette, not from magic.
Send the image to the Mesh Generator endpoint
Your request includes:
- the image (base64 or multipart)
- a reconstruction mode
- optional hints for scale or density
Keep your parameters simple on the first pass. Let the AI show you what it thinks the object is. Don’t overcomplicate the request.
Wait for the reconstruction
This step takes a few seconds. The API is doing shape estimation, depth inference, and volume generation. Don’t spam requests. Just wait.
Download and decode the 3D mesh file
You’ll receive a GLTF-like structure with vertex data, normals, and surface info. Decode it cleanly, validate it, and save it.
Check the geometry before cleanup
Look at the silhouette.
Look at volume.
Look at the general shape.
If it’s fundamentally wrong (bad perspective, missing parts), regenerate. If the shape is good but messy, send it to CUBE 3D.
Once you understand this part, Roblox 3D AI stops being “experimental tech” and turns into a reliable base model generator you can use in a real studio pipeline.
2. Cleaning and Retopologizing the Mesh With CUBE 3D
Once Roblox’s Mesh Generator gives you a rough model, the real magic happens in CUBE 3D. This is where your AI-generated mesh transforms from “usable prototype” into something you can confidently put inside a live Roblox experience.
Here’s how proper cleanup and retopology should look:
Import the AI mesh directly into CUBE 3D
The API output is never perfect. It always needs a cleanup pass. CUBE 3D instantly identifies unstable geometry, open edges, warped surfaces, and mesh noise that would break in Studio.
Run automatic topology cleanup
CUBE 3D removes garbage geometry and rebuilds the mesh into a clean, stable structure. This eliminates bumps, spikes, surface layering, and accidental micro-geometry the AI occasionally creates.
Retopologize with Roblox performance in mind
This is the most important part.
CUBE 3D reduces polygon count without destroying your silhouette. You get low-cost geometry that remains visually accurate. Roblox MOBILE players will thank you for this.
Use CUBE 3D’s UV remapping tools
Roblox lighting exposes bad UVs instantly.
CUBE 3D generates new UV maps that give your textures clean, consistent, non-stretched coordinates. If you skip UV cleanup, your model will always look cheap.
Export a clean, performance-safe mesh
After cleanup and retopo, export the mesh in a Roblox-friendly format. Now your model is stable, lightweight, visually coherent, and ready for Studio.
CUBE 3D doesn’t replace the artist.
It replaces the boring part of being an artist.
It lets you focus on the visual identity of your game instead of hunting down broken vertices and stretched UVs.
3. Reducing Polygons for Roblox Gameplay Performance
Roblox is not Unreal.
If you dump high-poly models into your experience, your players will feel it immediately — lag spikes, frame drops, and mobile devices heating up like microwaves. Reducing polygons isn’t optional. It’s survival.
Here’s how to do it the right way:
Use CUBE 3D’s decimation tools intentionally
Decimation isn’t about smashing your model into a low-poly potato. It’s about removing unnecessary geometry while protecting the silhouette. CUBE 3D does this better than most tools because it preserves shape priority.
Your prop stays recognizable.
Your performance stays stable.
Aim for the real Roblox poly budgets
Here are safe targets most pro devs use:
- Small props: 300 to 1500 tris
- Medium objects (furniture, tools): 1500 to 3500 tris
- Large static structures: 4000 to 8000 tris
- Anything above that: only if absolutely needed
If your AI-generated mesh is above these numbers, decimate it. Roblox players run your game on phones from 2018. Keep that in mind.
Protect sharp edges and major features
When decimating, lock or preserve important details:
edges, corners, handles, support beams, structural lines.
Let the tool remove the invisible stuff inside flat surfaces or areas players never notice.
Eliminate hidden geometry
AI generators sometimes produce backfaces, internal shells, or duplicated layers. These inflate your poly count for no reason. Remove them before doing any decimation — it gives you cleaner results and reduces artifacts.
Re-evaluate the silhouette after reduction
Here’s the trick: players don’t see vertices, they see shape.
If the silhouette is intact, the model feels intact.
If the silhouette collapses, everything looks cheap.
Reducing polygons is how you turn AI models into Roblox-ready assets that won’t kill your game’s performance.
Do this step right, and your maps load fast, your FPS stays high, and your players don’t rage-quit from lag.
4. Exporting the Final Asset Back Into Roblox Studio
This is the moment your AI-generated model becomes a real, usable Roblox asset. The export step seems simple, but if you mess up the format, scale, or normals, Studio will punish you with broken shading, giant models, or invisible parts. Do it right and everything drops in smoothly.
Here’s the correct export workflow:
Export in a Roblox-friendly format
CUBE 3D lets you export in OBJ, FBX, or similar formats. Roblox Studio imports OBJ most reliably. Avoid formats with complex rigging or animation data. You only need clean geometry and UVs.
Make sure your scale is normalized
A common AI mesh mistake: models come out 10 times larger or smaller than intended. In CUBE 3D, set your scale to real-world proportions. If a chair is 1 unit tall in CUBE, it should be 1 unit tall in Studio. Clean normalization prevents massive headaches.
Check your orientation
Roblox uses a specific forward and upward axis. If your export is rotated or mirrored, your model will come in sideways. Before exporting, rotate your mesh so it aligns correctly with Roblox’s coordinate system.
Verify your UVs are final and clean
Roblox exposes bad UVs instantly.
If your model looks streaky, stretched, or patchy in Studio, the problem always starts in the UVs. CUBE 3D should already fix this, but verify before exporting.
Import using Studio’s Asset Manager
Drag your mesh file into Studio or use the Asset Manager to upload it. Check the import preview. Geometry should be clean. Normals should face outward. Textures should align.
When you handle export properly, your AI-generated asset enters Studio clean, stable, and ready for gameplay. No weird surprises. No last-minute Blender emergencies.