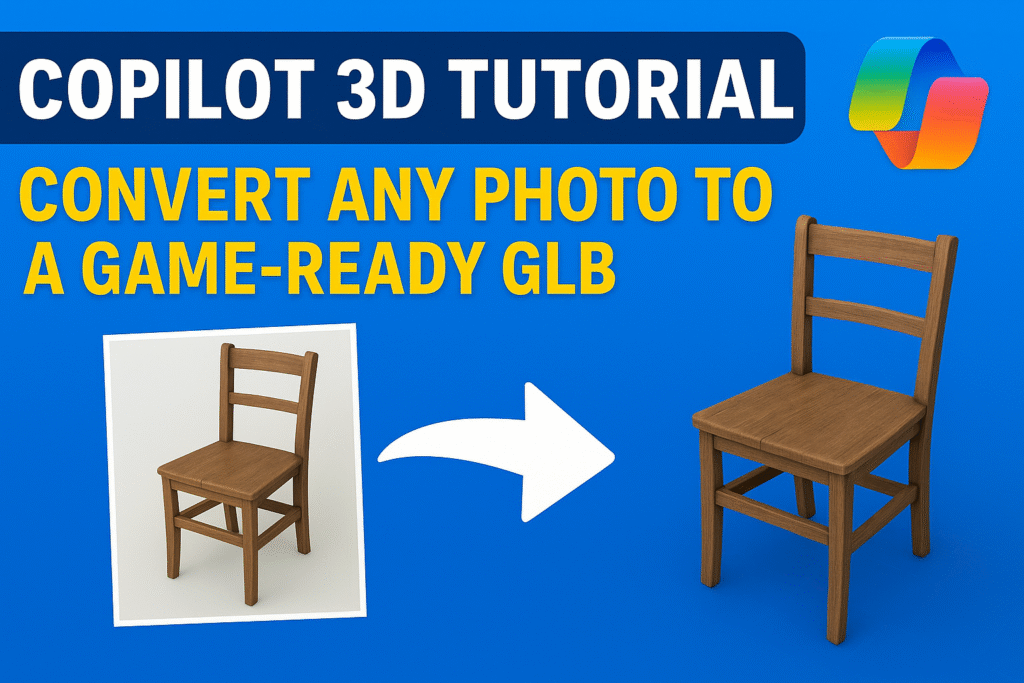
If you’re a 3D artist, game developer, or just someone tired of slow, manual modeling, this Copilot 3D tutorial is about to change the game. This isn’t hype. It’s a real tool that can take a simple 2D photo and turn it into a game-ready GLB in minutes. Yes, minutes.
Think about it. Normally, creating a 3D model from a reference photo could take hours or even days. Retopology, textures, UVs, cleanup, by the time you’re done, your coffee is cold and your back hurts. Copilot 3D promises to shortcut all that.
In this hands-on Copilot 3D tutorial, I’ll show you exactly how I converted a single phone photo into a fully functional GLB. We’ll go step by step, exposing the pitfalls most guides ignore, and I’ll tell you exactly when you should use it in a real game pipeline.
If you’ve been searching for a 2D to 3D photo GLB workflow that actually works without wasting hours, this article is your new blueprint. By the end, you’ll know whether Copilot 3D is a game-changer or just another shiny AI toy.
What is Copilot 3D?
1. AI That Understands 3D Structure
Copilot 3D is not a gimmick. It’s a serious AI engine built to understand the structure of objects from a single 2D photo.
Most 2D-to-3D tools guess shapes and produce messy meshes. Copilot 3D predicts depth, surfaces, and textures intelligently. It fills in hidden areas, smooths geometry, and generates a game-ready GLB faster than you could model by hand.
Think about it: you take a phone snapshot of a chair, and the AI outputs a fully usable 3D model. It’s not perfect, but it’s production-ready for prototypes, props, or rapid iterations.
This is why every 3D artist and indie game dev asking for a Copilot 3D tutorial or looking up 2D to 3D photo GLB workflows should pay attention. It turns slow, repetitive modeling into a few clicks and seconds.
The AI doesn’t replace your skill. It amplifies it, letting you focus on creativity instead of grunt work. And that’s the real reason it’s shaking up the 3D community in 2025.
2. Ideal Use Cases for Game Developers and 3D Artists
Copilot 3D isn’t for every scenario. It shines where speed beats perfection.
Low-poly props, environment blocks, and quick concept models are its sweet spot. You can turn reference photos into game-ready GLBs in minutes, not hours. For indie studios, that’s a huge productivity boost.
Prototypes are another big win. Instead of waiting days for a modeler to block out a scene, you can generate placeholders instantly. Test gameplay, camera angles, or environment layouts before committing to full production.
Even solo 3D artists benefit. Experimentation becomes frictionless. You can try dozens of ideas, tweak compositions, and iterate without grinding through tedious modeling tasks.
If you’re looking for actionable Copilot 3D tutorials or wondering how to leverage 2D to 3D photo GLB workflows, this is exactly where the tool proves its value.
3. Why Copilot 3D Is a Game-Changer for Artists
Speed is everything in 3D today. Copilot 3D doesn’t just save time, it reshapes how you approach modeling.
Before, turning a photo into a usable 3D asset meant hours of retopology, UV mapping, and texturing. Now, a few clicks and the AI delivers a GLB file ready for your pipeline. It’s not perfect, but it’s usable. That gap between concept and production just shrank dramatically.
It also encourages experimentation. You can test multiple ideas quickly, refine them, and avoid getting stuck in the tedious parts of traditional workflows. Copilot 3D amplifies your creative output instead of slowing you down.
For anyone serious about 3D or searching for Copilot 3D review, this tool proves that AI isn’t replacing artists, it’s making them faster and smarter. Use it right, and it can turn hours of work into minutes without killing quality.
Copilot 3D Tutorial: Preparing Your Photo
1. Choosing the Right Photo for Best Results
If your photo is bad, Copilot 3D can only do so much. The AI is smart, but it’s not a miracle worker. Picking the right image is the difference between a usable GLB and a messy, frustrating model.
Start with clarity: High-resolution photos with sharp edges give the AI more information to work with. Blurry or low-light images? Forget it. You’ll get holes, stretched textures, and weird geometry.
Watch the angles: Front or clear side views are safest. Complex perspectives or extreme foreshortening can confuse the AI. If your object is partially blocked, Copilot 3D will guess, but guessing can ruin your mesh.
Mind the background: A clean, contrasting background helps the AI separate the object from the scene. Busy, cluttered shots create noise and sloppy geometry. Solid color or simple textures work best.
Keep lighting simple: Shadows, harsh reflections, or strong highlights can trick the AI. Natural or even studio-like lighting ensures the AI interprets surfaces correctly.
Bottom line: this isn’t about perfection, it’s about giving Copilot 3D the best chance to succeed. A few smart choices here will save hours of post-conversion cleanup and get you a game-ready GLB faster.
2. Common Pitfalls to Avoid
Even with a decent photo, Copilot 3D can produce frustrating results if you’re not careful. Knowing the traps upfront saves time and headaches.
Overcomplicated objects: The AI struggles with intricate shapes, tiny details, or overlapping geometry. A photo of a simple chair will work; a tangled bike frame with cables? Not so much. Start simple.
Busy backgrounds: Don’t throw a cluttered scene at the AI. Patterns, multiple objects, or messy environments confuse the mesh generation. Stick to clean, contrasting backgrounds.
Strong shadows and reflections: Harsh lighting or reflective surfaces can trick Copilot 3D into creating warped meshes or strange textures. Soft, even lighting is your friend.
Extreme angles: The AI guesses hidden areas, but extreme perspectives often produce unnatural topology. Front or side shots are safest. If you want multiple angles, consider stitching them manually.
Avoiding these mistakes drastically improves your 2D to 3D photo GLB results. Trust me, most frustration in Copilot 3D comes from ignoring these basics.
3. Optimizing Photos for Conversion
Once you have a decent photo, a few tweaks make all the difference. These optimizations give Copilot 3D the best chance to produce a game-ready GLB.
Crop and focus: Remove unnecessary areas around your object. The AI works better when it can concentrate on a single subject. Background clutter or extra space slows it down and reduces accuracy.
Adjust contrast and brightness: Subtle edits help the AI distinguish surfaces and edges. A photo that’s too dark or too flat can confuse the mesh generation. Even minor improvements here yield cleaner topology.
Resize wisely: Copilot 3D prefers medium to high-resolution images. Tiny images lose detail; massive images may slow down processing without adding value. Find a balance that preserves clarity but keeps file size reasonable.
Orientation matters: Keep objects upright and aligned. A tilted or rotated object forces the AI to guess depth incorrectly, producing warped meshes. If needed, straighten the photo before importing.
These small adjustments take minutes but save hours of cleanup later. Optimized photos lead to smoother meshes, better textures, and faster workflow integration, exactly what every 3D artist wants.
4. Photo Examples That Work Best
Seeing is believing. The right photo can make or break your Copilot 3D conversion.
Simple objects with clear outlines: Think chairs, tables, bottles, or props with defined edges. The AI handles these quickly and produces clean 2D to 3D photo GLB results.
Good lighting, minimal shadows: Photos taken in soft, natural light or evenly lit studio setups yield better topology and textures. Avoid harsh shadows or bright reflections, they confuse the AI.
Front or side views: Straight-on shots work best. They give Copilot 3D the reference it needs for depth estimation. Avoid extreme angles unless you plan multiple shots for manual merging.
Single objects on clean backgrounds: A chair on a plain floor or a mug on a table with solid color works far better than cluttered scenes. One object at a time keeps the AI focused.
Following these examples consistently produces GLBs that need minimal cleanup, saving time in your game or 3D pipeline. It’s a small step that multiplies your workflow efficiency.
Copilot 3D Tutorial: Step-by-Step GLB Conversion
1. Opening Copilot 3D and Importing Photos
The first step is simple, but mistakes here cost time. Open Copilot 3D and make sure your system meets the minimum requirements. Modern Windows with a decent GPU works best, slow hardware will make the AI crawl.
Once the software is ready, import your photo. Hit “Import Image” and select your optimized file. This is why the previous section mattered: a clear, well-prepared photo drastically reduces errors at this stage.
Copilot 3D automatically analyzes the image and prepares it for conversion. Keep an eye on the preview window. If the object isn’t centered or the AI seems confused, adjust your photo and re-import.
Pro tip: always start with one object at a time. Don’t overload the AI with multiple items in a single photo. It will produce messy meshes, and fixing them wastes far more time than separating your shots.
By getting this right, you set the stage for a clean 2D to 3D photo GLB conversion and make all the following steps smoother.
2. Configuring Conversion Parameters
Once your photo is imported, Copilot 3D gives you a few parameters that can make or break your GLB output. Don’t skip this, default settings are okay for tests, but real production work demands tweaks.
Mesh Density: Higher density means more detail but heavier files. For prototypes or game props, medium density is usually enough. Too high, and you’ll waste memory and slow down engines. Too low, and your mesh looks blocky.
Texture Resolution: Keep textures sharp enough for your target engine. Mobile games need less detail, while desktop or console projects benefit from higher res. Don’t overdo it, textures take memory and loading time.
Background Removal: If your photo has a leftover background, make sure to enable background masking. Clean separation saves hours of cleanup later.
Preview Settings: Use the preview window to inspect the AI’s interpretation. Look for holes, strange artifacts, or odd topology. Adjust parameters before exporting. Small tweaks here save big headaches downstream.
Setting the right parameters is the difference between a usable GLB and a messy model you’ll hate to fix. Take the two extra minutes to tweak, your workflow will thank you.
3. Previewing the AI Output
Before hitting export, always inspect the AI-generated model. Copilot 3D gives you a preview, and this is your chance to catch mistakes early.
Rotate the model, zoom in, and check the topology. Look for holes, stretched textures, or weird geometry. The AI is smart, but it’s not perfect, small issues here are easier to fix than after exporting.
Check textures and colors carefully. Shadows or highlights in the original photo can confuse the AI, producing unexpected color shifts. Sometimes a slight tweak to brightness or contrast in your original image can dramatically improve results.
Pro tip: test different angles if your object has complex shapes. Even a single supplementary photo can help the AI fill gaps in depth prediction.
Previewing thoroughly ensures your 2D to 3D photo GLB will be cleaner, save time, and require minimal post-processing. Don’t skip this step, it’s a small effort with huge payoff.
4. Exporting to GLB and Common Fixes
Once you’ve previewed and tweaked your model, it’s time to export. Choose GLB format if your goal is game-ready assets, Unity, Unreal, and Godot all support it natively.
Before exporting, double-check scale and orientation. Copilot 3D sometimes outputs models that are upside down or off-axis. Fixing this before export saves frustration in your game engine.
Even the best photos can produce minor issues. Common fixes include:
- Small holes in the mesh
- Stretched or misaligned textures
- Extra geometry that shouldn’t be there
Most of these can be patched quickly in Blender or another 3D editor. The key is catching them early, not after importing into your engine.
Exporting correctly and handling these small fixes ensures your 2D to 3D photo GLB workflow is fast, predictable, and reliable, exactly what developers and artists need when deadlines looAssessing the GLB Output
1. Checking Topology and Mesh Quality
A clean mesh is everything. Copilot 3D gives you a fast 3D model, but it won’t always be perfect. Before you drop it into your game engine, inspect the topology carefully.
Look for holes or non-manifold edges: These are common in AI-generated meshes and can crash engines or break physics simulations. Small gaps can be fixed in Blender or similar software, but catching them early saves hours.
Check edge flow and vertex distribution: Uneven topology causes shading artifacts and bad deformations if your model needs rigging or animation. Copilot 3D usually gets simple shapes right, but complex areas like handles, wires, or furniture legs may need manual adjustment.
Polygon count matters: High-density meshes look nice but can kill performance in real-time applications. Low-poly models are faster but may lose detail. Balance is key, know your target platform.
Taking a few minutes to inspect mesh quality now ensures your 2D to 3D photo GLB is clean, efficient, and production-ready. Don’t skip this step, you’ll thank yourself later.
2. Evaluating Textures and Materials
Textures make or break a model. Copilot 3D handles a lot automatically, but it’s not perfect. A quick evaluation saves headaches in your game pipeline.
Check for stretching or misalignment: AI sometimes distorts textures, especially on curved or complex surfaces. Minor edits in Blender or a texture editor fix this quickly.
Look at colors and shading: Highlights or shadows from your original photo can carry over, producing unrealistic surfaces. Adjust brightness or recolor textures if needed before importing into your engine.
Material setup matters: GLB exports PBR-friendly textures, but sometimes roughness, metallic, or normal maps need tweaking. A small adjustment can make your asset look polished without manual repainting.
A careful texture check ensures your 2D to 3D photo GLB is not only mesh-accurate but visually ready for production. Don’t underestimate this step, textures are what players notice first.
3. Minor Fixes Before Game Import
Even the cleanest Copilot 3D models usually need a little touch-up before hitting your game engine.
Fill holes and clean geometry: Small gaps or stray vertices can break physics or shading. Quick fixes in Blender take minutes and prevent bigger headaches later.
Retopology for better performance: AI meshes can have uneven vertex distribution. A light retopology pass keeps poly count low while maintaining shape, essential for real-time games.
Texture alignment: Sometimes UVs are slightly off. Adjusting them now ensures textures don’t stretch or misalign when imported.
Check normals: Wrong-facing normals can make parts of your mesh invisible in engines. Flip them quickly to avoid frustrating render issues.
Spending a few minutes on these minor fixes ensures your 2D to 3D photo GLB is clean, stable, and ready for production. Skip them, and you’ll regret it in your game pipeline.
4. Performance Considerations for Games
A beautiful model means nothing if it tanks your game’s performance. Copilot 3D models are fast to create, but real-time engines care about polygons, textures, and draw calls.
Polygon count: Keep meshes lean. High-poly models look great but slow down rendering. Use retopology or decimation tools to reduce polygons without losing visual fidelity.
Texture resolution: Big textures eat memory and load time. Match texture sizes to your target platform. Mobile games need less detail than desktop or console.
Level of Detail (LOD): Prepare multiple LODs for larger scenes. Copilot 3D assets may need simplified versions for distant objects to maintain FPS.
Batching and optimization: Group static props and combine meshes when possible. This reduces draw calls and improves performance.
Following these steps ensures your 2D to 3D photo GLB workflow doesn’t just produce nice models, it produces models that perform reliably in real-time games.
Integrating the GLB into a Game Pipeline
1. Importing into Unity, Unreal, or Godot
Once your GLB is ready, the next step is getting it into your game engine. Copilot 3D exports are compatible with Unity, Unreal, and Godot, but each engine has its quirks.
Unity. Drag the GLB into your project folder. Unity will automatically generate a prefab. Check scale, rotation, and material assignments. Small adjustments may be needed for PBR textures.
Unreal Engine. Import via the Datasmith or GLB import option. Verify that textures map correctly and normals are facing the right way. Unreal sometimes flips axes during import, so rotate if necessary.
Godot. Godot’s GLB import is straightforward. Make sure to enable “Import Materials” and check for texture resolution issues. Adjust scale to match your scene.
Pro tip: always test in a simple scene first. This helps you catch scaling or material problems before adding the asset to a full level.
Correct importing ensures your 2D to 3D photo GLB workflow stays smooth and avoids headaches later in development.
2. Adjusting Scale, Orientation, and Materials
A model is only as good as how it fits in your scene. Copilot 3D can export a GLB quickly, but scale, rotation, and materials often need tweaking.
Scale. Check your model against existing assets. Copilot 3D doesn’t always match your engine’s unit system. Resize before placing it in a scene to avoid frustrating adjustments later.
Orientation. The AI might export objects upside down or tilted. Rotate them so the “up” axis aligns with your engine’s standard. This saves headaches with physics and animation.
Materials. Copilot 3D provides PBR textures, but roughness, metallic, or normal maps may require minor tweaks. Adjust in-engine for lighting consistency and realism.
Small adjustments here make a huge difference in game-ready GLB workflow. It turns a quick AI model into a polished asset that fits seamlessly in your project.
3. Lighting and Rendering Considerations
Even the best AI-generated GLB can look wrong if lighting isn’t set up properly. Copilot 3D textures respond differently depending on your engine and scene setup.
Check normals and roughness. AI-generated materials may react unexpectedly to light. Test under different conditions to avoid shiny or flat-looking surfaces.
Use consistent lighting. Avoid mixing drastically different light temperatures. Copilot 3D outputs assume neutral lighting; mismatched lights can make textures look unnatural.
Test shadows and reflections. AI models sometimes produce geometry that casts unexpected shadows or interacts oddly with reflections. Early testing prevents surprises during gameplay.
Proper lighting ensures your 2D to 3D photo GLB not only fits in the scene but looks natural and professional, saving time on post-render fixes.
4. Best Practices for Real-Time Performance
A GLB model that looks great but slows your game is useless. Performance is key when integrating Copilot 3D assets.
Optimize polygon count. Keep meshes lean. High-poly models may look impressive but kill FPS in real-time engines. Use decimation or retopology to balance detail and performance.
Use texture atlases. Combining multiple textures into one reduces draw calls. Copilot 3D outputs can be merged for efficiency without losing quality.
Implement LODs. For complex scenes, create multiple Levels of Detail. This ensures distant objects don’t drain resources while close-up models retain detail.
Batch static objects. Combine static props whenever possible to minimize draw calls. Proper batching keeps your scene smooth and responsive.
Following these best practices ensures your 2D to 3D photo GLB workflow delivers both visually and performance-wise, making AI-generated models truly game-ready.
Copilot 3D Tutorial: Pros and Cons
1. Strengths of Copilot 3D
Copilot 3D isn’t perfect, but it shines where it counts. Speed is the first major advantage. What used to take hours, blocking, retopology, basic UVs, now happens in minutes.
It’s also incredibly easy to use. Import a photo, tweak a few parameters, and you have a game-ready GLB. No steep learning curve or complex software required.
The AI handles common 3D headaches intelligently. Depth prediction, texture mapping, and filling hidden geometry are all automated. Even for beginners, you can produce usable assets fast.
Finally, iteration is instant. Experiment with multiple photos or variations of the same object without wasting days modeling by hand. This makes Copilot 3D a powerful tool for both artists and developers looking to accelerate workflows.
2. Copilot 3D Tutorial: Limitations and Pitfalls
Copilot 3D is powerful, but it’s not magic. Understanding its limits prevents frustration.
Complex shapes struggle. Intricate objects with tiny details, overlapping parts, or irregular geometry often produce messy meshes that need manual cleanup.
Shadows and reflections can confuse the AI. Harsh lighting in your photo can lead to strange textures or distorted surfaces. Even optimized images sometimes need tweaks.
Not a replacement for skilled modelers. For high-detail production assets, you still need traditional modeling. Copilot 3D accelerates workflow but won’t create AAA-ready models alone.
Scale and orientation issues. AI guesses object size and alignment, which sometimes requires adjustments before importing into game engines.
Knowing these pitfalls keeps expectations realistic and ensures your 2D to 3D photo GLB workflow remains efficient. Use it smartly, and it’s a productivity booster; misuse it, and you waste time.
3. When to Use It
Copilot 3D excels when speed and iteration matter more than perfection.
Prototypes and placeholders. Quickly generate props, environment blocks, or concept models to test gameplay or level design without waiting for a full artist build.
Low-poly assets for games. Indie developers and small teams benefit from AI-generated meshes that are ready to drop into Unity, Unreal, or Godot with minimal cleanup.
Concept exploration. Artists can experiment with multiple ideas fast, tweaking shapes, textures, and compositions without starting from scratch each time.
Learning and experimentation. Beginners can see how AI interprets 2D photos into 3D, helping them understand modeling, texturing, and depth in a practical way.
Use Copilot 3D strategically, not blindly. When applied to the right tasks, it accelerates workflow dramatically while keeping quality acceptable for most game and prototype needs.
4. When Manual Modeling is Better
Copilot 3D is fast, but some projects still demand hands-on modeling.
High-detail production assets. Characters, complex machinery, or intricate props often require precise topology, clean UVs, and custom textures that AI can’t reliably produce.
Stylized or creative designs. Copilot 3D works best with realistic, simple objects. If you want exaggerated forms, artistic exaggeration, or unique stylization, manual modeling is the way to go.
Animation-ready models. Rigging and deformation require controlled topology. AI-generated meshes often need significant retopology before they can animate correctly.
Critical visual fidelity. For cinematic shots or AAA games, even minor AI inaccuracies in mesh or texture can break immersion. Manual modeling ensures pixel-perfect control.
Knowing when to trust AI vs. doing it yourself is key. Copilot 3D is a productivity booster, not a universal replacement.
Copilot 3D Tutorial: Practical Tips and Workflow Hacks
1. Batch Processing Multiple Photos
Speed is one of Copilot 3D’s biggest advantages, and batch processing multiplies it. Instead of converting photos one by one, group similar images and process them together.
Set consistent parameters. Mesh density, texture resolution, and background removal should be standardized across all photos. This ensures uniform quality and reduces manual tweaks later.
Organize files first. Name and sort images logically. Copilot 3D can handle multiple inputs, but a chaotic file structure slows down your workflow and increases mistakes.
Preview selectively. Not every batch item needs full inspection. Check a few samples to ensure the AI interprets them correctly, then proceed with the rest.
Batch processing transforms Copilot 3D from a single-asset tool into a production-ready workflow accelerator, perfect for rapid prototyping or populating game environments with multiple props.
2. Combining Copilot 3D with Other AI Tools
Copilot 3D is powerful on its own, but pairing it with other AI tools supercharges your workflow.
Texture enhancement. AI-powered texture generators can refine Copilot 3D outputs, fix lighting issues, or create stylized surface details that the initial export can’t achieve.
Retopology AI. Quickly clean up dense or uneven meshes for real-time performance. Copilot 3D gives the shape; retopology AI gives clean, optimized geometry.
Cleanup and repair tools. AI can help fill holes, smooth surfaces, or fix artifacts automatically, saving time compared to manual adjustments.
The trick: use Copilot 3D as the foundation, then layer specialized AI tools to polish your models. This creates a fast, high-quality pipeline for generating game-ready 3D assets from photos.
3. Speeding Up Iterative Testing
Iteration is where Copilot 3D shines. Trying multiple ideas or refining assets used to be a slog; now it’s almost instantaneous.
Duplicate and tweak. Export one model, adjust parameters slightly, and generate variations. This lets you test different mesh densities, textures, or angles without starting from scratch.
Use a consistent workflow. Keep your photo prep, import settings, and preview checks standardized. Small process improvements save massive time across multiple iterations.
Rapid feedback loops. Drop AI-generated assets into a simple scene to test lighting, scale, and gameplay impact before committing to final designs. Quick failures are cheap failures.
By streamlining iterations, you reduce development time while maintaining high-quality outputs. Copilot 3D isn’t just about speed, it’s about smart, efficient experimentation.
4. Workflow Integration for Small Teams
Copilot 3D isn’t just for solo artists. Small teams can leverage it to accelerate collaboration and production.
Centralize assets. Store AI-generated GLBs in a shared project folder or cloud drive. Everyone on the team can access, tweak, or test without confusion.
Assign roles strategically. One person handles photo prep, another tweaks parameters, and a third reviews outputs. This keeps the workflow smooth and prevents bottlenecks.
Version control matters. Keep track of iterations and exports. AI-generated assets can vary subtly, and versioning ensures you can revert or compare easily.
Integrate with engine pipelines. Standardize import, scaling, and material settings in Unity, Unreal, or Godot. This avoids repetitive fixes and keeps the team focused on creativity.
Small teams that follow these principles turn Copilot 3D into a reliable production tool, not just a one-off experiment. Efficiency scales when the workflow is smart.
Final Thoughts
1. Verdict: Who Should Use Copilot 3D
Copilot 3D isn’t for everyone. It’s a tool for speed, iteration, and experimentation, not a replacement for high-end modeling skills.
Indie game developers. Quickly generate props, placeholders, or environmental assets without hiring a full 3D team.
3D artists exploring concepts. Test ideas fast, create multiple variations, and see how photos translate to 3D before committing hours to traditional modeling.
Small studios and teams. Efficient workflows, batch processing, and easy integration make it ideal for limited resources.
If you’re after rapid prototypes or game-ready GLBs with minimal effort, Copilot 3D is your best friend. If you need AAA-ready characters or cinematic-quality assets, manual modeling is still king.
2. Experimentation Encouraged
Copilot 3D is most powerful when you play with it. Don’t treat it like a strict workflow, think of it as a creative partner.
Try different photos. Lighting, angles, and backgrounds affect results dramatically. Test variations to see how the AI interprets them.
Mix objects. Simple props or complex shapes behave differently. Experimenting helps you understand strengths and weaknesses, guiding future workflow decisions.
Iterate rapidly. Each iteration teaches the AI what works for your project. Minor tweaks in mesh density, texture resolution, or preprocessing can yield surprisingly better results.
The AI is a tool for learning and speed, not a magic button. Treat each test as an experiment, and you’ll discover workflow shortcuts and creative opportunities you’d otherwise miss.
3. Key Takeaways from This Copilot 3D Tutorial
Let’s cut to the chase. Copilot 3D works best when you use it smartly.
Prepare your photo. Clear, simple, well-lit images produce far better results than cluttered or poorly lit ones.
Tweak parameters. Mesh density, texture resolution, and background masking can make or break your GLB output. Small adjustments save hours later.
Preview and fix early. Catch topology, texture, and orientation issues before exporting. Early fixes prevent game engine headaches.
Use AI as a foundation, not a crutch. Combine Copilot 3D with other AI tools for texture enhancement, retopology, and cleanup to accelerate your workflow.
Iterate and experiment. Rapid testing with multiple photos or variations is where AI shows its true power.
Follow these principles, and your 2D to 3D photo GLB workflow becomes faster, cleaner, and game-ready every time.